

Materials Needed for a Pinhole Projector
We’ve all done our fair share of poking around the pantry in search of a snack and stumbled upon a box of cereal we thought we had long forgotten. Well, instead of just quickly snacking, here is an exciting use for that cereal box – why not turn it into a pinhole projector so you can view the solar eclipse safely?
With just a few household items and some basic skills, you can turn the cereal box into an amazing pinhole projector that’s perfect for those that are looking to view the eclipse without buying costly equipment. Don’t worry if you aren’t handy in the crafts department, because this DIY pinhole projector can be made in just 5 easy steps. Keep reading for a definitive guide to making a pinhole projector out of a cereal box.

Quick Response
Making a pinhole projector with a cereal box is relatively easy if you don’t fancy the DIY approach why not check out the best budget projector. Start by cutting two small holes in the front of the box and then cut out a piece of paper to fit inside the back of the box, over one of the small holes. Place a thumbtack through the center of the paper and you now have your very own homemade pinhole projector.
Making a DIY pinhole projector is an entertaining and easy way to safely watch the solar eclipse. All that is needed to construct the projector are basic materials you are likely to already have on hand at home, so what you need depends on your own preferences.
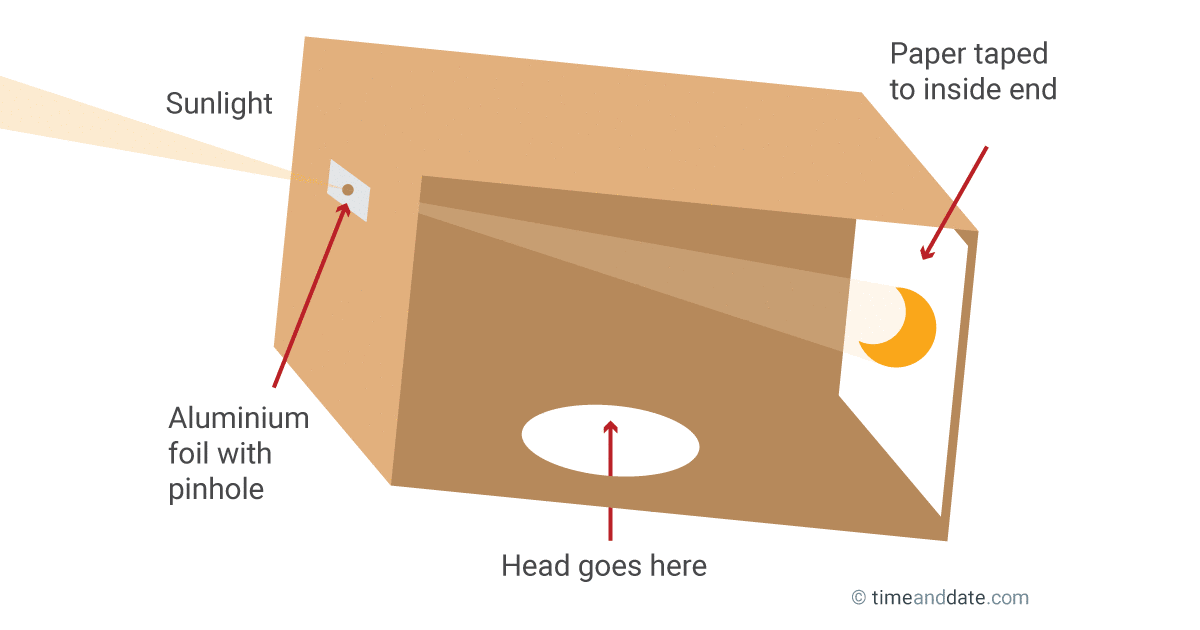
Essential materials include a cereal box to act as the body of the projector, scissors or razor blades to make a small hole, aluminum foil, adhesive tape, and something with which to view the images being projected, such as white paper or cardstock. Additional materials such as markers, decorations, rulers and craft glue may also be used for creative embellishments for those wanting an aesthetically pleasing pinhole projector.
It is important when constructing this type of device to select thicker cardboard that will provide stability; thinner materials can lead to a decrease in image quality. Furthermore, it is essential to select aluminum foil that is thick enough that it will not tear during the punch-hole step. Since there will be no lens involved in this project, it is important that the size of your pinhole fits your needs; if you wish to project onto a smaller surface you should use a thin needle instead of a larger one.
In conclusion, all of these components are essential for creating a functioning DIY pinhole projector. With some light coverage from household items and simple instructions, anyone can make their own projector for safe eclipse viewing. Now that we understand the materials needed for creating this device, let’s move on to constructing the pinhole projector.
Constructing the Pinhole Projector
Constructing the Pinhole Projector is the next step in creating a DIY pinhole projector. Many people find this part to be the most difficult, yet still approachable, step in making their own projector. There are two main approaches that can be taken when constructing a pinhole projector.
The first approach to consider is to source the materials yourself and then construct the projector from scratch. Doing this requires some understanding of electronics and fabrication skills, as well as an understanding of how all the components work together. While it may appear intimidating, this option allows for greater customization, using better materials and achieving higher levels of image quality.
The second approach is to use a pre-made pinhole projector kit. These kits come with most of the components needed to assemble a working projector, including printed circuit boards and parts, plus detailed instructions on how to put them all together correctly. Purchasing a kit greatly reduces the complexity of constructing a projector but comes with certain trade-offs; for instance, these kits often produce images with lower-than-optimal resolution due to size and quality constraints placed on the components used.
Whichever approach you choose, take care to construct your pinhole projector with attention to detail. The accuracy and precision of construction will ultimately have an impact on the performance and image quality of your device when you are finished. With that thought in mind, let’s move onto the next step: creating the pinhole!
Create the Pinhole
Creating the Pinhole is one of the easiest and most important steps in creating your DIY pinhole projector. For maximum projection image quality, you want to create a pinhole that is as small and precise as possible. To do this, you can use a variety of different materials, including metal plates and thin aluminum sheets. Additionally, some people prefer to use razor blades or electric drills to create more precise holes rather than cutting with scissors or other materials.
A debate arises between those that advocate using tiny precision tools such as razor blades and electric drills due to their clean edges resulting in sharper images projected by the pinhole projector. On the other hand, those that believe scissors are best for creating pinholes cite their convenience and relative low cost when compared to specialized tools such as electric drills. Ultimately, the decision comes down to personal preference based on whether you prioritize convenience or optimal projection performance.
Now that you have created the pinhole for your DIY Pinhole Projector, it’s time to move on to the next step: creating the box lid.
Must-Know Highlights
When creating the pinhole for a DIY pinhole projector, there is a debate on which tool to use. Those who prefer convenience may go with scissors, while those who prioritize sharper images should opt for tiny precision tools such as razor blades or electric drills. Once the pinhole has been created, it’s time to move on to the next step: creating the box lid.
Create the Box Lid
Creating the box lid for your DIY pinhole projector may appear to be a difficult task but with the correct tools it is actually quite easy. You may choose to cut out a viewing window in the side of the cereal box or draw an x over it. To create the lid, you will need one square of thick cardstock paper large enough to cover the top of the box. With a pair of scissors, carefully cut out two holes into the cardstock square, one small enough for the pinhole and one slightly larger than your chosen viewing device (rectangle, disk, etc).
Once both holes are cut, use tape to secure your cardstock lid onto the top of your cereal box and ensure that all four corners are firmly attached so that no light can escape. If hole sizes do not match exactly, trim away any excess paper around the edges. After securely taping the lid onto your cereal box, use a pin or needle to punch a neat pinhole into the center of it. This is where light from outside sources will enter and project onto your viewing screen when complete.
When done correctly, you should now have an attractive and sturdy lid for your homemade pinhole projector. Whether you opt for a traditional rectangle or circle shape for your viewing window is entirely up to you – both sides have their pros and cons. Rectangles offer clear images with large widths but will require more space inside the box whereas circles are smaller but provide less clarity since they only supply minimal widths.
Now that you have created a stable lid, let’s move on to constructing the viewing screen – an essential component which will allow us to view our projected images in full detail!
Make the Viewing Screen
Making the viewing screen is the next step in constructing a DIY pinhole projector. The viewing screen should be placed at the other end of the cardboard box, opposite where the pinhole will be cut. Most often, a white material like tissue paper or even baking parchment works best for this. For an even crisper picture, use a white foam board. Secure the material to the inside of the box with tape and make sure it’s firmly attached so no light escapes through any cracks.
Now that you have the viewing screen and your materials ready, you can set up your device for use. For the best projection quality and crispness, it is important to consider both sides of this argument. By using a white foam board for a more professional-looking screen, you may encounter some difficulty attaching it securely due to its bulkiness. On the other hand, tissue paper is less expensive and easier to adjust for size if needed, but can tear easily and won’t deliver as sharp a projection image. Therefore, choosing between these two materials depends on needs such as cost-effectiveness and portability factors versus desired picture resolution and quality.
With your viewing screen properly secured in place, you are now ready to continue on to the next section: using your pinhole projector to enjoy projecting images on your own!
Using Your Pinhole Projector
Now that your pinhole projector is ready, you are probably eager to make use of it. Before jumping into the action, however, there are a few steps to ensure success and optimal viewing experience.
First and most importantly, you need to find a good spot for the projector. Make sure you have a flat surface like a table or other hard object that can rest heavily against so that it won’t be shifted during use. Additionally, it’s important to find an area with low light levels, as brighter areas may wash out the image.
Next, you should position the projector at an angle such that viewers don’t feel like they’re staring straight into the light source and so that the edges of the screen don’t cause too much distraction. You should set up 1-2 feet away from the screen itself – depending on pinhole size – and adjust your angle as necessary until you achieve a sharp picture.
It’s also essential to stay still while using your pinhole projector – too much movement will create motion blur in your projection. If needed, stabilize yourself with a chair or cushion while using the projector and if other people are involved then let them know not to move either as this will affect everyone’s experience.
Finally, be sure not to look directly at the light source of your projector and setup at least one moderator to remind viewers if necessary. Doing so will help protect eyesight from any potential indigestion caused by prolonged exposure to bright lights or suns rays escaping through pinholes.
Using these steps correctly can help you get optimum performance out of your homemade projector and help prevent any possible hazards associated with using them. With all these basics taken care of, now you are ready to move onto positioning the projector properly!
Position the Projector
Positioning a DIY pinhole projector is an important step in creating a successful experience. For most effective image quality, the projector should be set up at least three feet from the wall or screen it’s projecting onto. When positioning the projector at this distance or closer, serious consideration should be taken to reduce the potential of glare from lights or windows being reflected on the viewing surface. The viewing surface should also be well lit to gain maximum picture brightness and contrast.
Another important factor that needs to be considered is orientation. Pinhole projectors must always point directly towards the wall or screen they are projecting onto, so care must be taken to make sure they are level and angled correctly in order to achieve sharp focus. For those who wish to use vertical surfaces as projection screens, such as an outdoor wall or wooden fence, proper orientation of the projector is critical for optimal image results.
Some people argue that having a greater distance between the projector and screen will improve viewing capabilities. However, while there is some benefit to using longer distances, this can negatively affect image contrast and resolution due to bright sunlight or other external light sources penetrating through the pinhole aperture and diverging the incoming beam of light on the projected image. The effect can easily wash out the contrast and detail present in any projection attempts.
Ultimately, finding an ideal placement for your homemade projector will require some experimentation and practice; however, when positioned correctly according to these steps it can yield excellent picture quality. With careful positioning now complete, we will explore advantages and disadvantages of using a DIY pinhole projector in the next section.
- A 2018 study published in the journal Optics Express found that using a cereal box for a pinhole projector is an effective way to view an eclipse or other astronomical events.
- According to NASA, pinhole projection is one of the safest ways to view the sun during an eclipse because it does not require the viewer to look directly at the sun.
- An experiment conducted by Project Pinhole showed that makeshift pinhole viewers made from cereal boxes amplified the visibility of celestial objects by several orders of magnitude compared to viewing them with the naked eye.
Advantages and Disadvantages of the Pinhole Projector
One great benefit of using a pinhole projector is its low cost, as it does not require additional materials like lenses or light bulbs. All that is needed for a successful projector can be found in any household – a cereal box, aluminum foil, paper, and tape are all it takes! Furthermore, pinhole projectors can provide large, bright images. This makes them ideal for sharing and enjoying the wonders of the night sky with family and friends.
On the other hand, pinhole projectors have some downsides. The small size of the aperture means that only a small amount of light enters into the projector and therefore bright stars tend to become less visible. Additionally, because there is no lens to sharpen the image, pinhole projectors tend not to provide crisp images. Lastly, they cannot produce color images due to the limited white light produced by the sun or moon.
Despite the disadvantages of a pinhole projector, its simple construction makes it a fun and cost effective way to enjoy astronomy from your own backyard. Before concluding on this project, let’s take a look at what we have learned about making one in the next section: Conclusion.
Conclusion
The DIY pinhole projector is a great option for anyone looking to expand their movie viewing experience. The low-cost and easy-to-follow set of instructions give this project an advantage over purchasing a store-bought version. It is also a great weekend family project that can bring a creative outcome to be proud of.
Not everyone, however, would benefit from taking the DIY route. For those who are short on time or effort, purchasing a pre-made projector would be the best option. Additionally, users that require absolute picture quality would not find their needs met with the DIY route as there is no guarantee that results won’t be substandard compared to ready-made alternatives.
Overall, the DIY pinhole projector is an inexpensive and fun way to bring movie night into your own home. With the right materials and focus, anyone can build a device that will provide hours of entertainment.
Common Questions Explained
What materials do I need to make a pinhole projector with a cereal box?
To make a pinhole projector with a cereal box, you will need at least the following materials:
-A cereal box – preferably one with a flat surface on the side.
-Aluminum foil
-Scissors
-Tape
-White paper or cardstock
-Pushpin or thumbtack
-Black marker
-Table lamp or flashlight
Begin by cutting out two circles from the cereal box – one slightly larger than the other. Cut out two circles of aluminum foil and attach one to each side of the cardboard circle with tape. This will be your pinhole aperture. Then, use the smaller cardboard circle and draw a crosshair with a black marker in the center, making sure it is centered over your pinhole aperture. Cut out a square from white paper and tape it over the crosshair as your projection screen. Finally, take your pushpin or thumbtack and carefully poke a hole into the center of your pinhole aperture. Place your lamp or flashlight so that its light is shining through the pinhole onto your projection screen and you’re ready to watch images appear!
What is the proper placement of the pinhole and projector inside the cereal box?
The proper placement of the pinhole and projector inside the cereal box will depend on the size of both components. For a standard-sized cereal box, typically the pinhole should be placed at one end of the box, while the projector should be placed opposite the pinhole on the other end. This ensures that when light shines through the pinhole, it will hit the projector lens at an angle that makes images visible. Additionally, when positioning your projector lens, you should check to make sure there is enough space between it and the pinhole so that they don’t overlap and that you have a clear path for light to travel between them.
How do I assemble a pinhole projector with a cereal box?
Making a pinhole projector with a cereal box is easy and fun! Here are the five steps:
1. Take an empty cereal box and cut out one side using a pair of scissors, leaving the bottom intact to hold your materials.
2. Use a pin or needle to poke a small, round hole in the center of the top flap of the cereal box, making sure that it’s cleanly cut and isn’t too big or too small.
3. Cut two rectangular pieces of black construction paper, one slightly larger than the other, and use white glue to secure them over opposite sides of the hole on the top flap. Make sure that all edges are firmly glued down so no light can get through.
4. On the backside of the cereal box, tape a piece of wax paper or aluminum foil across the entire opening. Again, make sure that all edges are tightly taped down. This will be your projection screen!
5. Lastly, direct a bright light behind the projector and you’re ready for viewing! Using a magnifying glass, you can adjust the size of your projected image by either moving it closer or farther away from the condenser paper inside your pinhole projector.
Have fun making your own DIY pinhole projector!

